Showing posts with label natural. Show all posts

Tuesday, February 9, 2016

Why you should try warmer wood tones at home

In a world where dark "coffee" wood tones are taking over the budget market, I'd like to propose a warmer and brighter alternative. Warmer wood tones can create a more contemporary look, and serve as an extension of the outdoors inside if done properly. To achieve a similar look, I suggest considering maple, white oak, redwood, or teak over coffee colored veneers. There are also several other great options for warmer wood tones, especially if the wood is sourced internationally.  

Here are a few of my favorite designs showcasing warmer wood architectural features. I really love the contemporary feel! I promise these bright wood tones will leave you feeling upbeat and inspired. 


Designed by Applegate Tran Interiors, Image via Houzz


Cape Town, South Africa home - Architecture: SAOTA, Interior Design: OKHA

Cape Town, South Africa home - Architecture: SAOTA, Interior Design: OKHA

Vancouver home designed by Kelly Deck, Image via Design Rulz

If you've been avoiding lighter, natural wood tones, then here's a small push to begin embracing this naturally stunning look. How gorgeous is this Vancouver home shown above and below? Designer Kelly Deck's selection of neutral and cream colored decor pulls the look together and allows this blond wood tone to shine. 

Vancouver home designed by Kelly Deck, Image via Design Rulz

Designer Jenni Kayne's Los Angeles home, Architectural Digest

Designer Jenni Kayne's Los Angeles home featured in Architectural Digest (above) is a beautiful example of reclaimed wood used in an elegant and sophisticated manner. I love that this room is refined, yet rustic at the same time. Also noteworthy are the inviting, white sofas. An excellent choice that really pop against the wood. 

Designed by Applegate Tran Interiors, Image via Houzz


Auckland, New Zealand home by architect Michael O'Sullivan, Interior Design: Yvette Jay, Image via Dwell

If you prefer a more unique approach to wood, then take a look at these amazing rooms (above, below). The chevron patterned ceiling is fantastic, and really quite unique, and I love the rich stain used in the wood panelled ceiling below. 

Chandelier design by Lindsey Adelman, Image via Analog Dialog


California home designed by Turnbull Griffin Haesloop Architects, Image via House Beauty 

Would you be open to trying warmer wood tones for your home's walls, ceiling, or kitchen?

Saturday, January 23, 2016

What to do when it's freezing outside? Grow microgreens indoors!


If any of you made New Year resolutions to eat healthier in 2016, then this blog post will definitely be a great resource. Microgreens are full of nutrients and great as a salad, in addition to being a fun, indoor gardening project. It's the perfect activity to try during this cold, winter season. Cassie Johnston of Back to Her Roots, a healthy eating and gardening blog, is showing us just how it's done.  By then end of this post, you'll be able to grow your own microgreens at home, too. 

You might be asking, well what the heck is a microgreen? Well, a microgreen is the new, tender shoot of a vegetable plant. It’s what happens if you let a sprouted seed go a little bit farther into growing, but don’t let it completely mature. These greens are tender, sweet, and insanely good for you—they are literally one of the healthiest veggies on the planet! Newly sprouted, tiny microgreens have up to 4o times the nutrient impact as their mature plant counterparts. 40 TIMES! Just a single example: microgreens from red cabbage seeds have 40 times more vitamin E and six times more vitamin C than fully-grown red cabbage. Crazy, right?

Microgreens make an awesome winter substitute for lettuce or other cooking greens—we like microgreen and sprout salads in the winter when our garden isn’t producing. You can also use them on sandwiches, in stir-frys, or in casseroles. And the best part, they are insanely easy to grow indoors. Like, I promise you can do it. Even if you’ve killed stuff before. You can do it!


So, what do you need to get grow your own microgreens? Not much, actually:
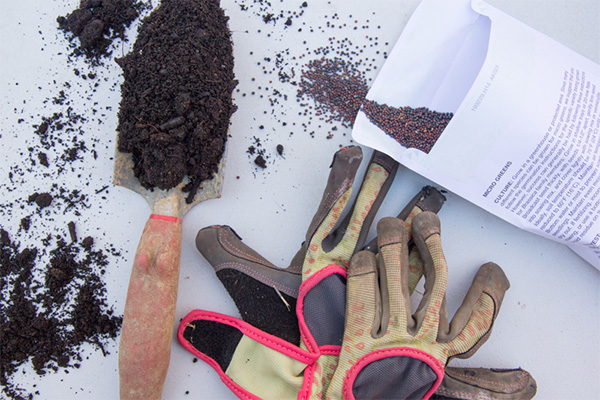
  • Microgreen Seeds: You can use almost any vegetable seed to grow microgreens (some are tastier than others, though), but a lot of companies offer special microgreen seed mixes that are a great option for first-timers. They have a nice variety of tastes, textures and nutrition. I really like the microgreen mixes from Johnny’s Seeds. If you don’t want to go with a mix, cilantro, kale, radishes, basil, and beets are all great seeds to start with.
  • Soil: Seed starting medium is your best bet, but honestly, you can grab just about any potting mix or garden soil from the store and have good luck. I’d personally steer clear of soils that have fertilizers mixed in—you don’t want those yucky chemicals in your greens! We make our own seed starting mix, but there are some really nice organic options available at most stores this time of year. I even saw an organic potting mix at my grocery store last week!
  • Tray: You’ll need something to grow your microgreens in. We use regular seed starting trays—available at most garden centers and hardware stores—but honestly, you can use pretty much anything. These greens aren’t going to stay in them very long, so it doesn’t have to be anything special. A plastic tote or a galvanized tub or heck, even a baking dish!
  • Light Source: There are two ways of going about this—the natural way or the artificial way. For the natural way, all you need is a sunny window. Easy! Unless you have a cat, like we do, and then they will make that warm tray of soil their bed. So we do our microgreens under a fluorescent light in a cat-proof room. You don’t need any kind of special light or lightbulbs. Just get the cheapest fluorescent shop light you can find (we have this one) and outfit it with two regular fluorescent lightbulbs. They’ll try to tell you you need special full-spectrum light bulbs for your grow lights—at about four times the price—and they might make your greens grow a touch better, but not enough to warrant the price in my opinion. Hang the light about four inches above the table where you’ll set your tray.
  • Water: Duh. I recommend using a spray bottle for microgreens.

First step is to fill up your tray with soil. Since these plants aren’t going to be in there very long (9-12 days), they won’t develop a very intricate root system, which means you don’t need a whole lot of soil. About two inches worth should be more than enough.


Then you spread your seeds across the surface of the soil. No need to worry about getting it perfectly even or spaced out equally.


You want to put a pretty thick coating down. Unlike when you’re growing a full, adult plant, you don’t have to worry about overcrowding with microgreens. Pack ’em in.


Next, take a little more soil in your hand, and sprinkle it over the seeds. You’re just looking for light coverage here. Again, no need to be perfect. You don’t have to cover every seed exactly the same.


Then take your hand and lightly press down all across the tray to really set the seeds into their new home.


Last planting step: give ’em a good drink of water. The spray bottle is for later, now is the time to use a watering can or the mist option on your hose sprayer. You don’t want them swimming in water, but you do want them very, very damp. 


Then, put your tray in your sunny spot and wait! Or, if you are putting them under a grown light, place them directly under the light. You actually want the light to almont be touching the top of the tray (the light in this picture is actually a bit too high up.) 


 If you’re trying to start your seeds in a particularly cool place, you might want to think about either cranking the heat for a few days while the seeds germinate, or use a seed starting mat. You can get seed starting mats from gardener’s supply stores for beaucoup dollars, or you can do what we do, and just use an old electric blanket under the tray. A heating pad works, too!


A few days later, you’ll see even more seed germinating, and then the true leaves starting to show. These are the ones that actually start looking like the plants you are used to, albeit really tiny, adorable versions.


And then after a little over a week, you’ll have a whole tray full of beautiful microgreens. You can choose to harvest at any point after the true leaves show up.

I normally let mine go until about the 10 day mark, when the greens are about two inches tall.


To harvest, you can either clip the greens with sharp kitchen scissors...


Or do what I do, and pull out the greens and shake off the extra soil. You’ll need the soil to be extra dry to do it properly, so I stop watering a few days before I’m going to harvest. Then, on harvest day, pull up the greens, and shake of the excess soil.


Then I do 3-4 wash cycles on the greens, making sure they are full submerged in cold water each time. Then spread them out on a towel and dry them off slightly (a salad spinner works, too). To store, I then wrap them in paper towels and place in an airtight container in the fridge.


The soil can then be composted, and you can start all over again! Or, if you’re really on top of things, you can have multiple trays going at the same time. I’ve found that starting a tray each week ends up working out well for us—it takes us about a week to get through the harvest from one tray.

See, super easy, right? You can totally grow your own food! I promise. Happy growing! 
  

Friday, October 16, 2015

Chic meets Rustic: Decorating with Reclaimed Wood

Happy Friday!  Today I thought I'd post a throwback feature that was really popular in 2014.  It's all about using rustic natural elements in chic interior design... because sometime nature does it best!  Don't forget about using reclaimed wood as a unique decorative accent in your home.  Here's some stylish inspiration to get you started.

The Sky is the Limit Design, Works Photography

I just love bringing the outdoors in! Brining reclaimed wood into a space really helps to achieve that.  I should also note that you don't have to be resigned to farmhouse style to make reclaimed wood work in your space either. Not only that that, but reclaimed wood can be very, very chic!  The reclaimed wood dining table above is such a great example of the chic-ness that can be reclaimed wood. The Sky is the Limit Design creates such stylish juxtaposition be combining this root wood dining table with the contemporary chrome leg dining chairs.  Just one of the many ways one can add reclaimed wood to their space. 


REFINED LLC, Martha O'Hara Interiors

Against the cream color palette the reclaimed wood ceiling above really pops.  Designed by Martha O'Hara, this sunroom is just lovely!  O'hara's use of the rustic wood slabs on the ceiling gives this room a special cottage-charm.  It all comes together quite nicely, especially with the chandelier.  I'd absolutely enjoy relaxing in this room. Am I warming you up to decorating with reclaimed wood yet? 

Home of Keri Russel, Image via Elle Decor, Photography by William Waldron 


Rafael de Cárdenas, Image via Elle Decor

Stunning antique Moroccan doors accent this feminine, purple living room.  This room was designed by Rafael de Cárdenas for model Jessica Stam's Manhattan apartment. Stam says these reclaimed doors were already installed in the apartment when she moved in.  Winning! Let's hope my next home comes with one-of-a-kind antique, Moroccan accents.  A minor request for my realtor. 


Rafael de Cárdenas, Image via Elle Decor


Reclaimed wood adds a wonderful natural warmth to a room and could be a great accent to consider the next time you're redecorating.  Have a great weekend!