Showing posts with label DIY. Show all posts

Monday, November 13, 2017

Entertaining with Style: Paper Ave parties with paper flowers!

It has been too long since our last Entertaining with Style feature! I am so glad to have more hosting and party inspiration for you, especially as we approach the holidays. Today creative business woman Donna Tran of Paper Ave shows us how she decorated her most recent party, a 2 year business anniversary celebration! Paper Ave is a company that sells artistically created crepe paper flowers as well as hosts fun flower making workshops. Here is a peek at her recent event. 

My name is Donna Tran-Corona and I am the artist and owner of Paper Ave, a business that specializes in colorful and cheerful handmade crepe paper flowers.  The business was officially established in October of 2015 as a side-hustle and after getting married and moving to Huntington Beach a year later, I decided to pursue the life of a creative entrepreneur full-time and what a ride it has been!

When my friend Deanna from Smoke and Brine Co. Warehouse reached out to me to teach a workshop at her new venue, we decided that it would be a ton of fun to celebrate Paper Ave's second birthday there by hosting a celebratory workshop to mark the occasion. Here's how I planned this exciting event!


Having a design background has really helped me be comfortable in working with colors and I definitely wanted to use bright colors to create a fun, colorful and festive environment. Our guests included long time college friends, new friends who I have met from past workshops (this was their 3rd one with me for a few of them!) and a few vendors who have been such a crucial support within my business. 


Each attendee at the Paper Ave workshop was provided with their own kit that included the templates, crepe paper, floral wire, vase, moss and additional supplies. Our paper flower kits are always packaged with a labor of love to make opening each kit an enjoyable experience on its own.


For party decor, a colorful bouquet with various handmade paper flowers including peonies, roses, dahlias, and little wildflowers were used as centerpieces, paired with white vases to allow the colorful flowers to pop. Custom cookies inspired by the workshop were made by Jennifer Tee based out in Irvine, CA and they were the cutest keepsake for everyone (almost too pretty to eat!).


What's a birthday party without some delicious bites and drinks along the way?  Deanna from Smoke & Brine. Co provided the most beautiful and colorful platter filled with various cheeses, fruits, and nuts and it was a perfect match with our DIY mimosa station (champagne, sparkling cider, orange juice and some fresh blueberries and raspberries). 


Loren of Four Things Paper provided the 'Gather and Graze' calligraphy signage as a beautiful backdrop for the food and drinks area. Some fresh florals and a number 2 gold balloon were used to celebrate the occasion as well. I also paired live greenery with my colorful paper flower hoops, which made a great backdrop for people to gather in front of for photos. This party was so much fun to put together and a great way to celebrate 2 years for Paper Ave!


Here are my top 10 tips for your next festive celebration:

1.  Don't be afraid to use colors!  Colors have always been an inspiration for me and I just think it can be used to create a fun, festive and happy environment!  There are many places to bring in color, from the centerpieces, decorations and food to name a few!

2. Simplicity goes a long way.  It also makes it easier for yourself, and cleaning up afterward as well!

3. Have a DIY drink station so people can control how much alcohol they'd like in their drink.  Also provide non-alcoholic alternatives.

4. When working with a colorful set of flowers for a centerpiece, use a contrasting lighter vase so that the flowers can really pop.  Wooden slabs can be used to help create levels for the various centerpieces.

5. Create name cards for guests so that groups can be seated together.

6. Decorative paper plates help provide a nice pop of color and makes clean-up a cinch as well.

7. Adding a touch of greenery by each setting makes a great decorative detail!

8. Grazing platters allow attendees to have something to nibble on throughout the event and party.  

9. Have a fun backdrop so guests have a place to take photos at. You can even assign a unique hashtag for social media so you can use it to look back on photos that your guests take!

10. Provide a fun and unique keepsake that guests can bring home with them.

Interested in having your next event or dinner party featured in our Entertaining with Style series? If so, email me with details of your event!

Paper Flowers: Paper Ave // Venue: Smoke & Brine Co. Warehouse // Grazing Platter: Smoke & Brine Co. // Calligraphy: Four Things Paper // Photography: Rachael Smith Photography // Custom Cookies: Jennifer Tee // Paper Plates: Harlow and Grey (purchased from Happily Ever Etched)

Monday, September 25, 2017

DIY Architectural-Style Floral Arrangement - Video tutorial


Exciting news!! I've been busy working behind the scenes to bring you a new VIDEO SERIES! Interiors by Jacquin blog will now present an inspirational video post once a week. These videos will range from sharing home decor tutorials, to behind the scenes at events and showcasing studio visits with artists & designers. Our very first video will show you how to create a gorgeous floral arrangement at home. This particular floral arrangement has a unique architectural look that we achieved with a combination of flowers from the grocery store and with branches from the backyard. It's really that easy, and now you can learn how to create this chic style of floral arrangement for yourself! 


Thank you to Ambra Portillo of Query Events for joining me in this video tutorial and lending her expert knowledge. With Ambra's floral expertise and assistance, I am definitely feeling more confident with my floral arranging skills. Ambra is a floral designer and owner of Query Events based in Ft. Worth, TX. Here is our tutorial on creating your own architectural-style floral arrangement at home. We hope it inspires you!


Make sure to SUBSCRIBE so that you don't miss the next video in our series. Have a great week!

Tuesday, November 8, 2016

DIY Marbled Paper Organizer (or Magazine Holder)


Hi everyone! I'm so excited to have a new DIY craft for you today. I've partnered with the Paper Source to bring you this useful (and stylish) sponsored post and it features their beautiful marbled fine paper. This DIY idea came out of my need for a system to organize my mail and it happens to be super easy. Here's how to make your own paper organizer (or magazine holder) in an attractive marbled design using a free priority mail box from the post office. Let's get started! 

Materials:
1. Priority mailing box from the Post Office (medium size)
2. Soft grip knife (Xacto knife)
3. Self-healing cutting mat
4. Scissors
5. Paper Source Marbled Fine Paper in the color of your choice (or try using old wrapping paper!)
6. Mod Podge (matte)
7. White acrylic paint
8. Paint brush
9. Gold foil adhesive tabs
10. Super glue

Step 1. Mark your USPS mailing box for cutting. The front will be cut down to 5 inches tall and all other edges will be cut at 12 inches in height. See my photo for reference.


Step 2. Score the lines that you will be cutting with your xacto knife first to make cutting the box to size much easier. After you go over each line with an xacto knife, then complete the cutting process with your scissors following along your scored lines. 

Step 3. Once you have cut the box to size, then assemble the box including sealing the bottom, which should have an adhesive strip to do so, just like when you're sealing a box for mailing. 

Step 4. Paint over the text on the priority mail box with your white acrylic paint. Allow to dry.

Step 5. Once your box is dry, take the specialty paper you will be wrapping your box in and cut it to size. In order to do this, trace the edges of your assembled box onto the back of your paper. Allow a 2" border around the full shape you've traced. Once you have traced the outline of your box, cut the paper along the lines you've drawn. 


Step 6. Now you're ready to apply the mod podge so that you can adhere your specialty marbled paper to the box. (You can use wrapping paper to cover your cardboard as well.) Paint the Mod Podge product onto the entire box, not missing any spaces. Then quickly coat your pre-cut paper in Mod Podge as well, covering the full backside of your paper in the Mod Podge liquid. Once the box and paper have been coated, now you can line up your paper onto the box and press it on. Smooth your paper onto the box with a wall paper roller or tile smoother (or your hands) in order to avoid bumps or bubbles. There will be excess paper along the edges. Cut the loose paper at the corners and fold the excess paper into the inside of the box. For the bottom, fold the excess paper underneath the bottom of the box. Seal the edges down with Mod Podge. 

Step 7. Once your paper is adhered to the box, immediately coat the entire outside of the box in another layer of Mod Podge. Allow your box to dry overnight. 


Step 8. The next step is to create your labels. Cut your gold foil adhesive tabs in half and then fill out your labels with a fine-tip permanent marker. Glue your labels to the front of your new paper organizers. 

Step 9. Now it's ready to use! You may also cover the inside with white paper like I've done for a more professional look. Enjoy!


This easy DIY craft has solved my mail storage problem and I absolutely love the look too! I especially like that each organizer has it's own unique marbled pattern thanks to the Paper Source's selection of fine paper. Not to mention that my gold file tabs make the perfect accents to this luxe marbled look. Let's just say that I'm extremely happy with how this do-it-yourself project turned out. Let me know if you decide to give this DIY paper organizer a try!

Thursday, August 25, 2016

Decorating wtih Ornamental Ceiling Medallions


For a high impact, yet cost effective update to a special area in your home, try installing an ornamental ceiling medallion. A ceiling medallion can be the perfect accent for a unique chandelier and will work well with most light fixtures. I really love the romance and architectural element that ornate medallions add to a room, so I've rounded up my favorite interiors showcasing this gorgeous ceiling feature.

The Heathered Nest


London residence designed by Cochrane Designs.

After a day of research and viewing tons of stunning ceilings, it seems that it's hard to go wrong when decorating with a ceiling medallion. All of the rooms I've come across with this architectural feature have been spot on! For example, I love how regal this master bathroom looks with its intricate ceiling medallion and oversized tufted pouf. These are just the kind of details that begin to make your home feel a little more like a vacation destination.

And if you're new to this architectural feature you'll be glad to know that installing a ceiling medallion is rather simple. The most detail oriented part is cutting a proper sized hole in the center of the medallion to install you light fixture through (although some will already have a cut-out for your light fixture when you purchase it). Here is a great tutorial on how to install a ceiling medallion in detail.

Ceiling fan + medallion combination by Kristin Jackson

On another note, I've never seen a ceiling medallion paired well with a ceiling fan, so the bedroom design above from designer Kristin Jackson was pretty exciting. This interior design serves as proof that a ceiling medallion is still completely possible even if your room has a ceiling fan. Just make sure that the style of your ceiling fan and medallion do not clash aesthetically.

Closet door DIY tutorial from One Kings Lane. 

Lastly, don't forget that you can even beautify smaller spaces like bathrooms, hallways, and office spaces with ornamental medallions. For a twist on the traditional ceiling medallion, take a look at One Kings Lane's recent DIY where they upgrade closet doors using circular medallions. I am loving the feminine, European touch that these luxe doors give the room!

All of these rooms showcasing stunning medallions peaked my interest so I went on the hunt to source the perfect ceiling medallions online. Here are a few majorly chic medallions to consider for your home.

This architectural feature is perfect for introducing instant luxury to your space!


1. Ekena Millwork Benson Classic Ceiling Medallion - $59.95 
2. Ekena Millwork Eryn Ceiling Medallion - $66.95 
3. Elk Lighting English Study Ceiling Medallion - $180.00 
4. Hickory Manor House Crown Molding Ceiling Medallion - $329.95 
5. Elegant Lighting Mirrored Medallion - $200.00 
6. Elk Lighting Laureldale White Ceiling Medallion - $84.00

Tuesday, August 2, 2016

3 Great Ideas for Turning Fabric into Wall Art!

Looking for new ideas for adding wall art to your space? Why not try a unique, budget conscious solution like creating your own wall art with scraps of decorative fabric. Here's some inspiration for you!

Image via Burke Decor

Idea #1 

Install a large fabric panel behind your bed as a unique, color splash headboard.

(Left) via Focal Point Styling (Right) via Beauty and Bedlam

Idea #2

You can also frame your fabric to create wall art with a fine art feel. If you frame several pieces of fabric separately in complimentary colors, then you can expand to create a gallery wall as a focal point that showcases your unique fabric designs.

Image via Color Love

Idea #3

Hanging fabric panels as room dividers is also a fun idea that has a fine art feel to it! Layering light-weight solid fabric in different colors and suspending the fabric from the ceiling almost feels like installation art and still allows natural light to shine through. (see above.) Using a similar technique to hang heavy-weight fabric panels in bold patterns is also a nice approach to a room divider that allows for a bit more privacy than the colorful translucent panels shown above. You can find a great example of using a heavier weight fabric as a wall panel below. I have to say that I really love the idea of using hanging fabric as a room divider. Such a unique idea!

Image via Home-Dzine

If you decide to create wall art or make a room divider out of your favorite fabric, remember to avoid displaying any frayed ends. Once your fabric is cut, finish the edges with a sewing machine or upholstery tape. To avoid concerning yourself with frayed edges, try framing your fabric instead. Let me know if you give these ideas a try!

Saturday, January 23, 2016

What to do when it's freezing outside? Grow microgreens indoors!


If any of you made New Year resolutions to eat healthier in 2016, then this blog post will definitely be a great resource. Microgreens are full of nutrients and great as a salad, in addition to being a fun, indoor gardening project. It's the perfect activity to try during this cold, winter season. Cassie Johnston of Back to Her Roots, a healthy eating and gardening blog, is showing us just how it's done.  By then end of this post, you'll be able to grow your own microgreens at home, too. 

You might be asking, well what the heck is a microgreen? Well, a microgreen is the new, tender shoot of a vegetable plant. It’s what happens if you let a sprouted seed go a little bit farther into growing, but don’t let it completely mature. These greens are tender, sweet, and insanely good for you—they are literally one of the healthiest veggies on the planet! Newly sprouted, tiny microgreens have up to 4o times the nutrient impact as their mature plant counterparts. 40 TIMES! Just a single example: microgreens from red cabbage seeds have 40 times more vitamin E and six times more vitamin C than fully-grown red cabbage. Crazy, right?

Microgreens make an awesome winter substitute for lettuce or other cooking greens—we like microgreen and sprout salads in the winter when our garden isn’t producing. You can also use them on sandwiches, in stir-frys, or in casseroles. And the best part, they are insanely easy to grow indoors. Like, I promise you can do it. Even if you’ve killed stuff before. You can do it!


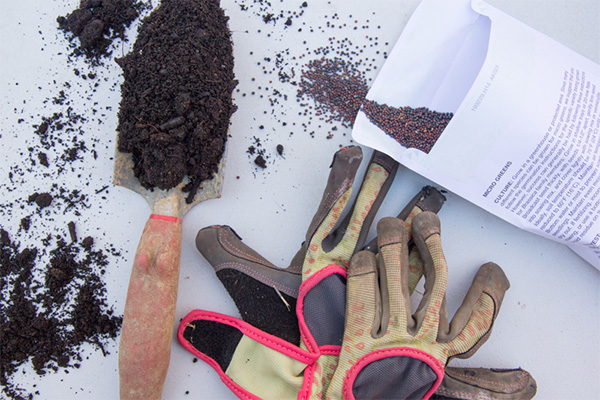
So, what do you need to get grow your own microgreens? Not much, actually:
  • Microgreen Seeds: You can use almost any vegetable seed to grow microgreens (some are tastier than others, though), but a lot of companies offer special microgreen seed mixes that are a great option for first-timers. They have a nice variety of tastes, textures and nutrition. I really like the microgreen mixes from Johnny’s Seeds. If you don’t want to go with a mix, cilantro, kale, radishes, basil, and beets are all great seeds to start with.
  • Soil: Seed starting medium is your best bet, but honestly, you can grab just about any potting mix or garden soil from the store and have good luck. I’d personally steer clear of soils that have fertilizers mixed in—you don’t want those yucky chemicals in your greens! We make our own seed starting mix, but there are some really nice organic options available at most stores this time of year. I even saw an organic potting mix at my grocery store last week!
  • Tray: You’ll need something to grow your microgreens in. We use regular seed starting trays—available at most garden centers and hardware stores—but honestly, you can use pretty much anything. These greens aren’t going to stay in them very long, so it doesn’t have to be anything special. A plastic tote or a galvanized tub or heck, even a baking dish!
  • Light Source: There are two ways of going about this—the natural way or the artificial way. For the natural way, all you need is a sunny window. Easy! Unless you have a cat, like we do, and then they will make that warm tray of soil their bed. So we do our microgreens under a fluorescent light in a cat-proof room. You don’t need any kind of special light or lightbulbs. Just get the cheapest fluorescent shop light you can find (we have this one) and outfit it with two regular fluorescent lightbulbs. They’ll try to tell you you need special full-spectrum light bulbs for your grow lights—at about four times the price—and they might make your greens grow a touch better, but not enough to warrant the price in my opinion. Hang the light about four inches above the table where you’ll set your tray.
  • Water: Duh. I recommend using a spray bottle for microgreens.

First step is to fill up your tray with soil. Since these plants aren’t going to be in there very long (9-12 days), they won’t develop a very intricate root system, which means you don’t need a whole lot of soil. About two inches worth should be more than enough.


Then you spread your seeds across the surface of the soil. No need to worry about getting it perfectly even or spaced out equally.


You want to put a pretty thick coating down. Unlike when you’re growing a full, adult plant, you don’t have to worry about overcrowding with microgreens. Pack ’em in.


Next, take a little more soil in your hand, and sprinkle it over the seeds. You’re just looking for light coverage here. Again, no need to be perfect. You don’t have to cover every seed exactly the same.


Then take your hand and lightly press down all across the tray to really set the seeds into their new home.


Last planting step: give ’em a good drink of water. The spray bottle is for later, now is the time to use a watering can or the mist option on your hose sprayer. You don’t want them swimming in water, but you do want them very, very damp. 


Then, put your tray in your sunny spot and wait! Or, if you are putting them under a grown light, place them directly under the light. You actually want the light to almont be touching the top of the tray (the light in this picture is actually a bit too high up.) 


 If you’re trying to start your seeds in a particularly cool place, you might want to think about either cranking the heat for a few days while the seeds germinate, or use a seed starting mat. You can get seed starting mats from gardener’s supply stores for beaucoup dollars, or you can do what we do, and just use an old electric blanket under the tray. A heating pad works, too!


A few days later, you’ll see even more seed germinating, and then the true leaves starting to show. These are the ones that actually start looking like the plants you are used to, albeit really tiny, adorable versions.


And then after a little over a week, you’ll have a whole tray full of beautiful microgreens. You can choose to harvest at any point after the true leaves show up.

I normally let mine go until about the 10 day mark, when the greens are about two inches tall.


To harvest, you can either clip the greens with sharp kitchen scissors...


Or do what I do, and pull out the greens and shake off the extra soil. You’ll need the soil to be extra dry to do it properly, so I stop watering a few days before I’m going to harvest. Then, on harvest day, pull up the greens, and shake of the excess soil.


Then I do 3-4 wash cycles on the greens, making sure they are full submerged in cold water each time. Then spread them out on a towel and dry them off slightly (a salad spinner works, too). To store, I then wrap them in paper towels and place in an airtight container in the fridge.


The soil can then be composted, and you can start all over again! Or, if you’re really on top of things, you can have multiple trays going at the same time. I’ve found that starting a tray each week ends up working out well for us—it takes us about a week to get through the harvest from one tray.

See, super easy, right? You can totally grow your own food! I promise. Happy growing!